
Tuesday, September 14, 2010
Circle Daisy Birthday
Thursday, August 26, 2010
Baby
Hello all of my few followers! We have some rather exciting news to share! We are having a third child due in March of 2011! We are very excited and will be finding out the gender as soon as we can (probably in October)! I am doing pretty well. I've had morning sickness but only feeling sick -not actually getting sick. It helped me to lose 10 pounds at the beginning of the pregnancy so I'm not complaining! Daniel is very excited to be a big brother again. Nathan doesn't quite understand yet but I'm sure he'll get it as time goes on and Mommy gets bigger and bigger. I'm already showing so I've had to bust out the maternity gear and fill out the wardrobe a bit. I don't mind. Maternity clothes are pretty much super comfy so it's like living in jammies all day! Once I have the chance to scan the first baby pic, I'll try to remember to post it on here!
Tuesday, May 11, 2010
Daniel likes to sing!
Chris's dad (aka Grandpa), got a video of Daniel singing Twinkle Twinkle Little Star. He loves to sing songs now! He does his ABC's or ABCD's as he calls them several times a day which is too cute! My mom (aka Dika) and I taught him how to spell his name and Nathan's name with a little song too. I'm hoping to get videos of these songs too. In the meantime, here's a link to the video of Daniel singing Twinkle Twinkle! Enjoy!!!
Fun and Exciting News!!
Nathan is walking!!!!!!!!!!!!! He's been cruising the walls and furniture for a couple of months but he took his first unassisted steps on his birthday which was April 21st. He added a few more here and there but this past Saturday, May 8, he just took off! He's walking all over the house, outside, you name it! He still has trouble keeping his balance sometimes and if there is an obstacle in his way, he usually goes back to crawling which he does VERY FAST!!!! But for someone who just started walking, he's doing really well! I'm so excited for him! And for me because this means he won't be getting as dirty outside! HAHA! Just in time for the weather to get nice! YAY! Check out my Nathan walking video! He's walking down the sidewalk outside on Mother's Day. So cute!
Nathan also finally has teeth which just thrills me! We were beginning to wonder if they would ever come in! aha! If he ever lets me, I'll get a picture of his teeth and post it! I'm hoping to post more card pics soon. My computer is currently broken and I'm using my old one which has no memory space left on it so uploading pictures isn't happening any time before I get my new computer fixed! Please comment and rate! :)
Nathan also finally has teeth which just thrills me! We were beginning to wonder if they would ever come in! aha! If he ever lets me, I'll get a picture of his teeth and post it! I'm hoping to post more card pics soon. My computer is currently broken and I'm using my old one which has no memory space left on it so uploading pictures isn't happening any time before I get my new computer fixed! Please comment and rate! :)
Sunday, March 28, 2010
For Erica and Bryan's baby girl
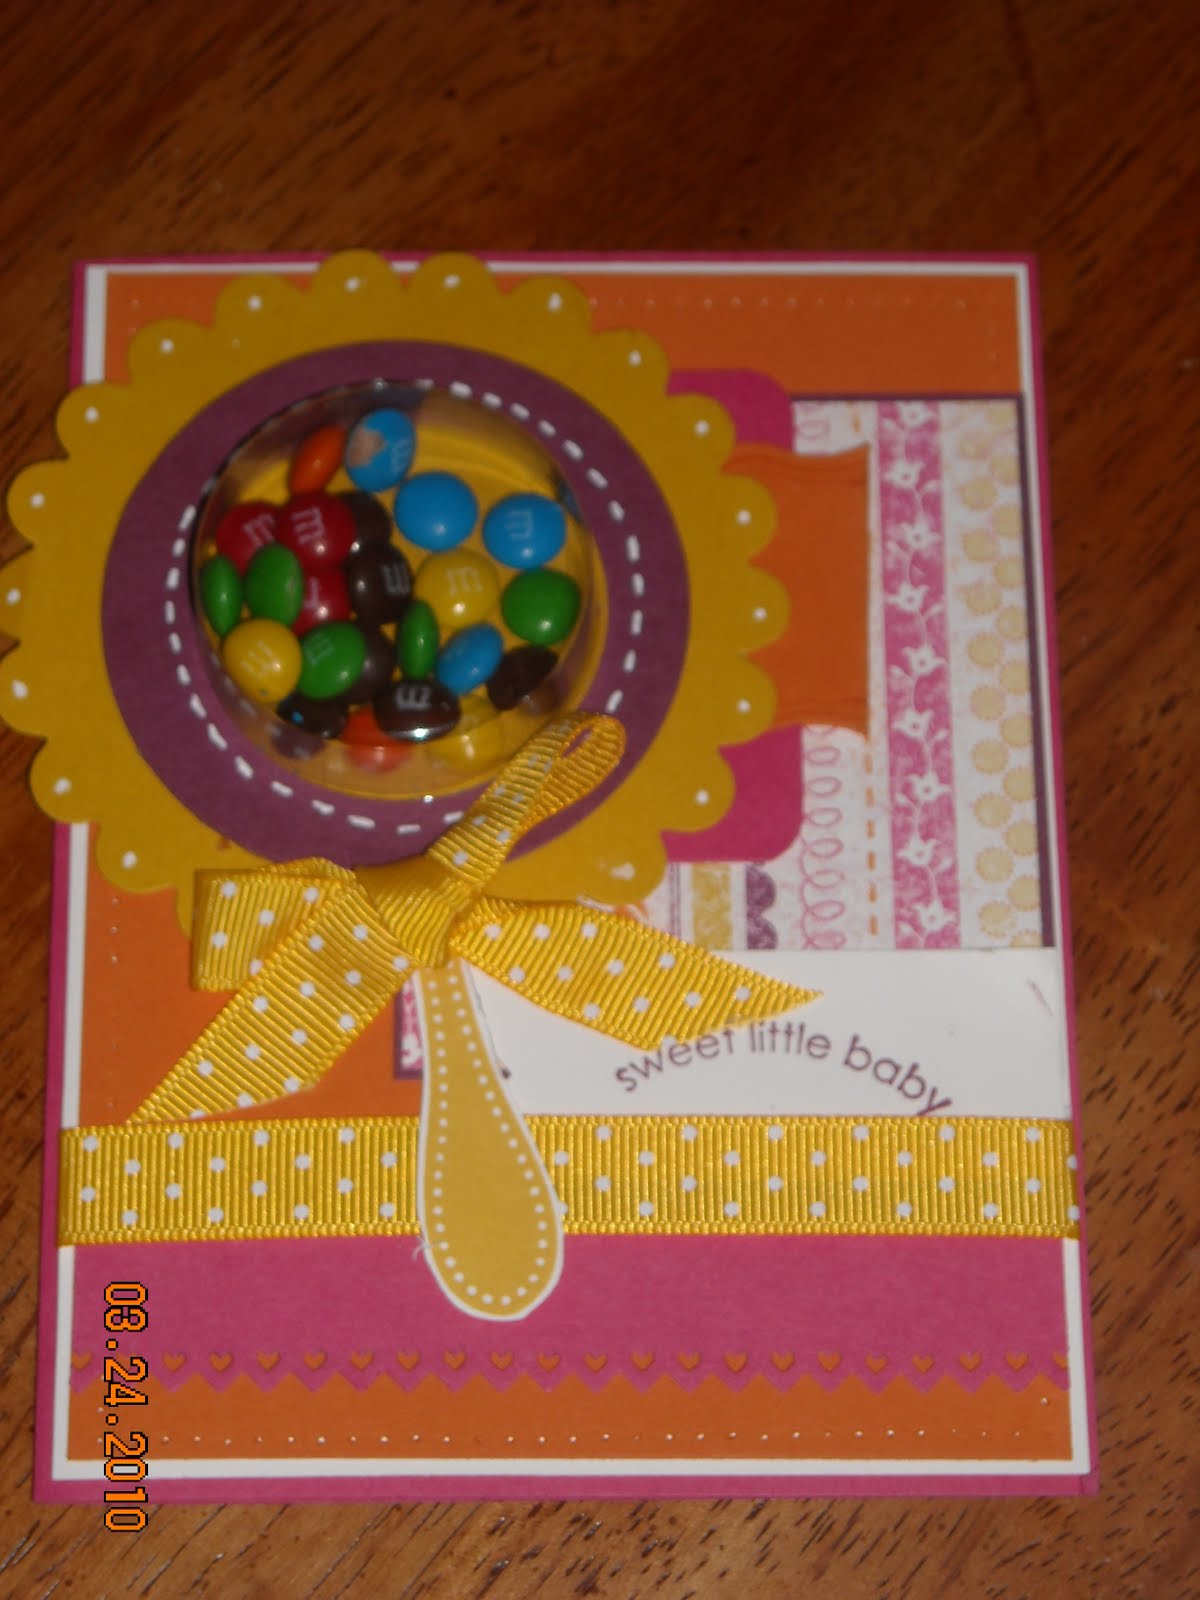
This is my second attempt at a sweet treat cup card and I think it turned out pretty cute! For this card I used the Something Sweet stamp set. The DSP is Razzleberry Lemonade. I used the larger of the 2 scallop circles on the Scallop Circles die for the Big Shot, Crushed Curry Polka-Dot Grosgrain Ribbon and the new Pinking Hearts Border Punch. The card stock used is Melon Mambo, Whisper White, Pumpkin Pie, Rich Razzleberry and Crushed Curry. I also used the Signo White Gel Pen for the faux stitching and doodle dots and the Mat Pack and Paper Piercing tool around the edges. Thanks for looking!
Saturday, March 13, 2010
Birthday Cupcakes

This was a fun card to make. I wanted to use the cupcakes from the "The More the Merrier" hostess stamp set which I just got! I love the cupcakes! Super cute! They are all on one stamp so it was easy to stamp and go. I used a bunch of colors on this: mostly inspired by the Razzleberry Lemonade DSP I used. To color the cupcakes, I used Pale Plum, Perfect Plum, Rich Razzleberry, Melon Mambo, Bermuda Bay, Pumpkin Pie and a little bit of Old Olive. I decided to cut them out and pop them up when the card was done because it seemed too flat to me. I used Pale Plum Card stock under the cupcake layer, then Bermuda Bay punched with the Scallop Trim Punch. The next layer was the DSP, then Rich Razzleberry punched with the Scallop Trim Punch again. This layer was actually 2 pieces of card stock only about 1 1/2 inches wide. I did this to conserve paper! Works great for an occasion where you're only seeing a tiny bit of it as an accent. Under that is a layer of Pumpkin Pie. The ribbon is Bermuda Bay polka dot ribbon. I stamped the "happy birthday" sentiment with Melon Mambo ink. Thanks for looking and please comment or send me an email!
Monday, March 8, 2010
Friend

This is my first card with the With All My Heart stamp set and using the Extra Large Fancy Flower punch. I really like the way it turned out. I got my inspiration from another card I saw here: http://www.splitcoaststampers.com/gallery/photo/1628196?si=with%20all%20my%20heart&perpage=12&thumbsonly=0&thumbcheck=
I changed mine a lot. My card base is Bashful Blue. The next layer is Rich Razzleberry 3/4" circles for a border then a layer of More Mustard, Whisper White and then Razzleberry Lemonade DSP. Then I used the Rich Razzleberry again and used the mat pack and paper piercing tool for the first time to do a line of piercing around the edge. The flower is punched out of More Mustard and the large flower from the With All My Heart set is stamped on it in More Mustard ink. The next layer of that is a 1 3/8" circle of Bashful Blue card stock and then I Whisper White 1 1/4" circle with the smaller flower stamped on it in Rich Razzleberry. The button is from the Playground Button collection. The ribbon is Bashful Blue striped. The "Friend" greeting is also from the same set and stamped in Rich Razzleberry ink. Thanks for looking and please comment!
Sunday, March 7, 2010
Abundant Hope for Easter Blessings

So, I saw a card similar to this one on splitcoaststampers.com and thought it was gorgeous! So, I recreated my own rendition of it. The card stock I used is Orchid Opulence, Very Vanilla, Rich Razzleberry, Old Olive and Certainly Celery and then some DSP from the Shades of Spring paper pack. I stamped the flower image with Elegant Eggplant and then colored it with Orchid Opulence and shaded with Rich Razzleberry and then the Elegant Eggplant markers. The leaves and stem are done in Certainly Celery and shaded with Old Olive. I also did some touches of light with the Signo White Gel Pen on the flower petals. The ribbon is Rich Razzleberry Polka Dot Grosgrain. I used the Modern Label punch for the greeting and layered them on top of each other. I also used the Scallop Trim punch and Scallop Corner punch too. Enjoy and thanks for looking!
Three Little Words...

This is my first scalloped circle card! I finally got the Scallop Circle Die and I LOVE it! I actually cut this Scalloped Circle for a different card I had in mind but changed that one and had this sitting on my desk so I decided to use it with something else. So, I looked through the Good Neighbor paper pack and found this cute tree print that coordinated with the Old Olive card stock I was already using. I also decided to use the Three Little Words stamp on this and the front is generic enough that it could say anything inside from that set. I used the Good Neighbor Stamp set to make the little houses and trees and cut them out and mounted them with Stampin' Dimensionals. Other card stock colors are More Mustard, Pumpkin Pie and Very Vanilla. Then I used the Old Olive 1/2" striped ribbon. I hope you like it!
Saturday, March 6, 2010
Paper Peonies Cards

I saw one of these on http://www.splitcoaststampers.com/ done by Sherri Barron who also had a tutorial on her blog: http://sherribarron.typepad.com/my_w...march-5-1.html Great tutorial! This flower is really easy to make and sooooo pretty! Even prettier in person! I decided to try it out using the Sending Love DSP as my inspiration because I hadn't used this pattern yet and I loved the Very Vanilla and Pretty in Pink combination! I added the Chocolate Chip card stock for some contrast along with the Chocolate Chip satin ribbon. I used the Scallop Trim border punch and for the peony, I used the Scallop #2 die for the Big shot and layered 6 of the scallops and then one of the smaller one on that same die in the Very Vanilla. For the center, I used a Clear Rhinestone Brad and the sentiment is from the Three Little Words set. Enjoy!
Here are 2 other ones I made the same day!
 For this one, I used Bermuda Bay card stock for the card base, accented with Real Red and Whisper White and the DSP is the Good Neighbor DSP I think it's called. I used a Real Red Sending Love Epoxy Brad and Bermuda Bay polka dot grosgrain ribbon. The punches used are the Scallop Border Punch, Word Window and Modern Label punches. This greeting is also from the Three Little Words set.
Thanks for looking!
Friday, March 5, 2010
Sweetest Day

This card was my first attempt at using the Sweet Treat Cup! I think it turned out cute. I pulled the colors from the Designer Series Paper I used which is from the Good Neighbor pack which is FREE in the Sale-a-bration Mini Catalog until the end of March! The card stock I used for the card base is More Mustard. The next layer is Taken with Teal which has a Scalloped Trim from the border punch also available in the Sale-a-bration mini! The next layer was Pumpkin Pie and that has the DSP layered on it. I used Real Red to frame the More Mustard backdrop for the gumball machine which is a jelly bean machine in my card. The stamp set I used is called Something Sweet and that is in the Occassions Mini. I coordinates with the Sweet Treat Cups and the 1 3/4" circle punch. I stamped the jelly bean machine in Real Red. I used the Curly Label punch for the pull on my trap door. The trap door is necessary for the candy to come out! I used the Word Window and Modern Label punchs for the greeting and I also stamped some jelly beans and cut them out but decided to use the real candy instead! Trial and error! LOL! Thanks for looking and please send me an email if you would like to order any of these awesome products or if you have any questions!
Thursday, March 4, 2010
Hippo Hooray Birthday
This card was recreated after seeing this card: http://www.splitcoaststampers.com/gallery/photo/1639793?si=pun%20fun&perpage=12&thumbsonly=0&thumbcheck= I made some changes and made it my own. I loved her choices as far as combination of Sweet Pea DSP papers and the Scalloped Circle. My changes were minor but they do make it different. I rounded half of the corners. My scalloped circle is larger. I used the Scalloped Circles Die for the Big Shot and then used a circle maker to make the middle sized circle. The inside circle was made using the Circles #2 die. I didn't have the striped Pumpkin Pie ribbon so I used a Turquoise stitched ribbon that I had around. I used Playground Buttons instead of cordoroy (I don't have the cordory ones yet!) and threaded them with pumpkin pie card stock. Cool trick I learned from Andrea Walford on youtube. I did some faux stitching too with the Signo White Gel Pen.

The card stock I used is Pumpkin Pie, Whisper White and Taken with Teal. The stamp set is Pun Fun which is a great versatile set! Something for almost any occasion in that set so it's a great starter set for someone new to stamping! I colored the hippo using watercolor pencils and water colored it for a nice subtle shading effect. This was after 3 or 4 attempts at coloring it with markers and a blender pen. This worked the best for me! Thanks for looking! Please rate and email me if you have questions or want to order!
Happy Moments Birthday Easel
I found a card almost identical to this one here: http://www.splitcoaststampers.com/gallery/photo/1628309 and I loved it so I made my own with my own personal additions. I added some shading to the cake and some more embellishements on the inside of the easel card. These cards are really cool and after a few attempts at it, I finally figured it out! YAY! Here it is closed:

I used the Sending Love DSP from Stampin' Up on the cover and on the inside of the card. I love this paper! It's so pretty! The sparkle is fantastic! The stamp is from the Happy Moments stamp set from the Sale-a-bration Mini Catalog. It is still available with a purchase of $50 for FREE! Super cute set! The ribbon is Chocolate Chip satin ribbon which is in the Occassions Mini too. I used Chocolate Chip ink to stamp the image and then used Pretty In Pink, Pixie Pink and Real Red Stamp'n'Write markers to color it in and shade it for a more dimensional effect. More Mustard was used to color in the candle flames. I then used my Two-Way Glue pen to add some Dazzling Diamonds to the candles and flowers!

Inside the card, I used more Sending Love DSP along with some Pretty In Pink card stock and Real Red Card stock. The Pretty In Pink as dry embossed with the Perfect Polka Dots Embossing Folder and my Big Shot. The greeting is from the Whimsical Words stamp set which is also in the Sale-a-bration Mini. I colored it with Chocolate Chip and Real Red Stamp'n'Write markers and then breathed on it to re-wet it and stamped it. The card's "kick stand" is a Sending Love Real Red Epoxy Brad which is also in the Occassions Mini catalog. I also rounded the corners with the corner rounder punch. I hope you like it! Please email me if you have questions or want to order some great stuff!
Monday, March 1, 2010
Butterfly Layers Birthday

I love these butterflies! They were created using the Beautiful Wings Embosslits Die which is available in the Occasions Mini catalog. They not only cut out 5 butterflies but emboss them too! They are SOOO pretty! This card will be for my grandma's birthday. She loves butterflies so this was a no brainer! :0) The card base is done with Soft Suede Card Stock. The next layer is Whisper White. I dry embossed the Melon Mambo Card Stock with the Perfect Polka Dots embossing folder which is also in the Occasions Mini catalog. There is also Bermuda Bay layered under that. The squares under the butterflies are cut at 1 1/2" squared and are in Bermuda Bay, Melon Mambo and Pumpkin Pie. The Soft Suede panel on the front is punched with the Scallop Trim Border Punch and Corner Punch. The trim punch is in the sale-a-bration catalog and the corner punch is in the occasions mini too! All available until March 31st! The Happy Birthday sentiment is from the Well Scripted Clear Mount stamp set which is also in the Occasions Mini right now too. If you like or want any of these things, please comment or send me an email @ stampinlyndsey@hotmail.com The Whisper White satin ribbon just finishes it off. Thanks for looking!!!
Sending Birthday Wishes

This card was inspired by a card done by Mary Fish. I thought it was sooooo pretty that I wanted to make my own. I couldn't make it exactly the same because I don't have any Basic Gray card stock like she used. So, I decided to go with a pink and brown concept. I used Chocolate Chip and Craft card stock with Whisper White, Pretty in Pink, and Sending Love DSP. The stamp set is my favorite sale-a-bration stamp set ever: Happy Moments. I've never used a free set so much! LOVE IT! The Sending Love DSP already had the glitter on it for some bling and I also added some of the Chocolate Chip Sending Love Epoxy Brads. I dry embossed the pieces of Craft and Pretty in Pink Card stock pieces too. The ribbon is Chocolate Chip 5/8" satin ribbon which is available in the Occasions Mini along with the Sending Love DSP and the Epoxy brads. I also did some faux stitching around the circles that I cut with my Big Shot and the Circles 2 die. Thanks for looking!!!
Sunday, February 28, 2010
Blooming in Turquoise

I saw this card by "beestamper" on http://www.splitcoaststampers.com/ . I just thought the turquoise on black and white was a gorgeous combination. I changed mine up a bit. She used a different DSP. I actually used the Botanical Blooms stamp set with Taken with Teal, Bermuda Bay and Tempting Turquoise classic inks and created my own paper. I also dry embossed the Tempting Turquoise card stock with the Finial Press embossing folder in my Big Shot. I colored the flowers with the stamp'n'write markers in Tempting Turquoise, Taken with Teal, and Bermuda Bay and then I added some Dazzling Diamonds with my 2-way Glue Pen. This card can be used for any number of occasions by adding a sentiment inside. Thanks for looking!
Grateful

I found that strip of striped paper from the Autumn Splendor or Autumn Meadows DSP pack and decided to build a card around it. I love this stamp set too. I stamped and embossed each leaf on Creamy Caramel card stock. I used the Craft Stampin' Spots for the Chocolate Chip, Really Rust and More Mustard. If you're wondering where the More Mustard one is, that is because I decided to leave it off because there wasn't enough room. For the Taken with Teal leaf, I stamped the leaf on Versamark ink and then into the Taken with Teal. All of them were then heat embossed with clear embossing powder. I stamped the greeting, which is from the Falling Leaves stamp set, with Chocolate Chip Craft Stampin' Spot ink and embossed that with clear embossing powder as well. The last little accents are the Chocolate Chip striped ribbon and More Mustard button from the Playground collection. I tied some white string through the button and around the ribbon too! Thanks for looking!
Friday, February 26, 2010
Too Kind Bird

I saw a card similar to this one on http://www.splitcoaststampers.com/ . I created my own version. I really wanted to use that bird cage stamp from the Happy Moments set from the Sale-a-bration catalog. It's super cute! The "You're too Kind" stamp is also a sale-a-bration stamp from the Whimsical Words stamp set. Both sets are super cute and versatile and FREE!!! For every $50 you spend, you get a free item from the sale-a-bration mini catalog! So awesome!!!!
The card is a standard sized card. I rounded the corners with the corner-rounder punch. I pulled colors from the patterned paper to do the rest of the card. I used Bermuda Bay and Real Red and Whisper White card stocks. Bermuda Bay and Real Red ink/stamp'n'write markers. And Bermuda Bay polka dot grosgrain ribbon. Enjoy and thanks for looking!
Tuesday, February 16, 2010
Card for Baby Jillian

I made this card for my cousins Rick and Jessica's daughter Jillian! She was born only 2 weeks ago! Congratulations to them! She's tiny and adorable and sleeps so much! I'm so jealous! LOL! Anyway, this card is the onesie card. I got the template from someone else's blog but I don't remember whose. I got it a while ago. Thanks to whoever you are!
The card begins as a standard card. Card stock cut at 4 1/4" X 11" and scored at 5 1/2". Then use the
1 3/8" circle punch to create a neck hole and the holes for the legs. About inches down from the top, draw a line in to 1/2" and from that 1/2" mark, draw a line to the top of the leg opening on each side. Then cut out that triangle on both sides. This creates the onesie shape. For the collar and the legs, use the scallop circle punch. For the neck you can just fold it in half and use it on both the front and the back. For the legs, cut a circle for each one and fit it. I have found the best way to make these is to punch out your 1 3/8" circle and then fit the scallop circle over it and punch. The best adhesive I've found to use for the scallops is the 2-way glue. It's the least messy and holds really well! :) The rest is decorating to your preference!
I used Pretty In Pink card stock for the main body of the onesie. Melon Mambo across the middle with whisper white trim punched with the Scallop Trim Punch from the Sale-a-bration mini. The Designer Paper is from the Razzleberry Lemonade set. I used Melon Mambo polka dot grosgrain ribbon and the stamp set is Fox & Friends from the Occassions Mini. I also used the Big Shot and the Perfect Polka dot impressions folder for the top of the onesie. I sprayed the whole card with Frost White shimmer paint mist and sponged the edges with Melon Mambo. Thanks for looking!
Saturday, February 13, 2010
Daniel is 3!!!!

Friday, February 5, 2010
Happy Moments Thank You

I saw Tami White make a paper flower like this one on her youtube video and thought it was really neat so I wanted to try it. I also saw a card made by Mary Fish that was similar is style to mine so I adopted it and made it my own. I think it turned out pretty neat! Let me know if you have any questions! Thanks for looking!
Happy Birthday Flower

Thursday, February 4, 2010
Shimmery Love You Much

I created this card for my friend Rich's wife Christine for Valentine's Day. He asked me to make her one in purple and red. So this was my second attempt and I like this one best so this will be the one I show him. I hope he likes it! I used some cool things on this card. Firstly, I figured out how to use the corner punch with the borner punch without messing it up or having it crooked or not match up. Worked out awesome on this card! I was so excited to get it right for once! I also used the shimmer paint mist on this too. You can see the sparkles if you look closely. :0)
The Breakdown:
Stamps:
Well Scripted, Happy Hearts
Paper:
Rich Razzleberry, Real Red, Whisper White, and Pretty In Pink
Ink:
Pretty In Pink, Rich Razzleberry, Whisper White and Real Red
Accessories:
Rich Razzleberry Polka-dot Grosgrain Ribbon, Sending Love Designer Brad
Tools:
Big Shot, Finial Press Embossing Folder, Frost White Shimmer Paint Mist, Scallop Trim Punch and Scallop Corner Punch
Thanks for looking! Comments are welcome and so are orders!
Saturday, January 30, 2010
Finial Press Love You Much

I saw this card on http://www.splitcoaststampers.com/ By Weekend Warrior but it had a few differences. I changed mine up and used a different sheet of the Sending Love DSP. I absolutely LOVE this paper! It's so pretty! This was also my first time using the Finial Press Embossing Folder. I love this texture! It adds a whole other dimension to the card and a touch of elegance! I sold 5 of these to my friend Eileen! YAY! I'm always accepting orders!
Breakdown:
Paper:
Sending Love DSP, Real Red, Whisper White and Chocolate Chip Card Stocks
Stamps:
Well Scripted
Ink:
Chocolate Chip Classic Ink
Accessories:
Whisper White Satin Ribbon
Tools:
Big Shot, Finial Press Embossing Folder, Sponge, Scallop Trim Punch
If you have any questions, please let me know! Thanks for looking!
Friday, January 29, 2010
Love Birds Valentine

I CASEd this card from "ohmyinkyfingers" on http://www.splitcoaststampers.com/ . My card is slightly different because I don't have the stamp set she used on hers so I used a different one that I had from a few years ago with those cute little kissing birds!
Breakdown:
Stamps:
Olive You, Teeny Tiny Wishes
Paper:
Whisper White, Real Red, Chocolate Chip, Pretty in Pink, Sending Love DSP
Accessories:
White Satin Ribbon, Rhinestone Brads
Tools:
Big Shot, Scallop Circle Die, Circle Die, Modern Label Punch, Word Window Punch, 1/2" circle punch
Big Shot, Scallop Circle Die, Circle Die, Modern Label Punch, Word Window Punch, 1/2" circle punch
Thanks for Looking!
Thursday, January 28, 2010
Butterfly and Bird Mother's Day
 I made this card for my mom for Mother's Day. I saw something similar but I changed the colors and the papers used and added the butterflies.
 The Breakdown:
Stamps: Vintage Vogue, Messages for Mom
Paper: Melon Mambo, Crushed Curry, Razzleberry Lemonade
Ink: Rich Razzleberry, Melon Mambo, Crushed Curry classic ink
Accessories: Rich Razzleberry Polka Dot Grosgrain ribbon, Rhinestone Brads
Tools: Bird Punch, Modern Label Punch, Big Shot, Butterfly Embosslits
Tuesday, January 26, 2010
Top Note Valentine

Here's the Breakdown:
Paper: Whisper White and Real Red Card Stock, Christmas Cocoa Designer Series Paper
Stamps: Whimsical Words, Vintage Vogue
Tools: Big Shot, Top Note Die, Scallop Circle Punch, 1 3/8" Circle Punch, Perfect Polka Dot Impresions Folder
Ink: Real Red
Accessories: White Satin Ribbon
Thanks for looking!!!
Wednesday, January 20, 2010
Fox & Friends Thank You's

I saw these cute thank you cards on http://www.splitcoaststampers.com/ posted by "forever designing". I thought they were super cute and small and quick and easy to make. I changed mine a bit because she used the Forest Friends stamp set and I didn't have it yet so I used the Fox & Friends set instead. I'm planning to make a box to go with them to put them inside and maybe a couple more cards to make it a set of 5 or 6.
The Breakdown:
Stamps: Fox & Friends, Trendy Trees
Ink: Chocolate Chip classic ink
Paper: Old Olive, Whisper White, Taken with Teal and Sweet Pea DSP
Tools: Oval punch, scallop circle punch and circle punches
Accessores: stitched pink and brown ribbon
Enjoy! {I'm always accepting orders ;0) }
Look Who's Turning 3!

The Breakdown:
Paper: Whisper White, Taken with Teal, Pumpkin Pie, Chocolate Chip and Sweet Pea DSP
Stamps: Choo Choo, Look Who's Turning... and the Train Track wheel
Ink: Taken with Teal and Chocolate Chip classic ink, Taken with Teal, Pumpkin Pie and Chocolate Chip Stamp'n'Write Markers, and Versamark
Tools: 1/16" hole punch, Paper trimmer, circle punches and the Modern Label punch, silver brad
Accessories: Chocolate Chip stitched grosgrain ribbon
Thanks for looking!
Tuesday, January 19, 2010
Choo Choo Birthday Invitations

I found these invitations while searching around for ideas on http://www.splitcoaststampers.com/ Anne Matasci posted some like this. I tweaked them just a bit. Her's weren't invitations but I really liked the idea of them being smaller and so easy to do. They are 3X3" cards so I made 9 of them in one day. I think they turned super cute! Probably going to have to make more!
 You can see in this example to the right that there is a train in the middle of the track wheel stamp. I had to make a masking for each train car. I stamped the train, then cut it out. Then I stamped the train on my card, covered the stamped image with the masking, and rolled my train track wheel over it so the track doesn't go over the train. Masking is a neat trick!
Here's the Breakdown:
Paper:
Ballet Blue, Crushed Curry, Real Red and Whisper White Card Stock
Stamps:
Choo Choo and Eat Cake (I think), Train Tracks Wheel
Ink:
Ballet Blue, Real Red, Night of Navy and Crushed Curry Stamp'n'Write Markers, and Chocolate Chip classic ink
Please let me know if you ever have any questions! Thanks for looking!
Butterfly Birthday
 I CASEd this card from someone on Splitcoaststampers.com. I thought it was beautiful and I was excited to use my new butterfly embosslits. How cute are they? Super duper easy to make too.
The Breakdown:
Stamps:
Whimsical Words, Vintage Vogue
Paper:
Bermuda Bay, Apricot Appeal, Whisper White, Melon Mambo, Old Olive
Tools:
Scallop Trim Punch, Butterfly Embosslits, Big Shot
Ink:
Versamark
Status Update!
Hi friends! Sorry it has taken me so long to post again. We were out of town for a while and I wasn't able to make anything. When we got back, I started making things again but didn't take pictures of them! Oops! So, I just took pictures of a bunch of the things I've been working on lately and I'll be posting more over the next couple of days. I posted 2 projects today and I'll be doing more soon! I just got a new shipment of products yesterday and started using a bit of it last night. Unfortunately with little ones it is hard to have time to go work on stuff. :0( Oh well! Well, I'm going to have to cut this short. My youngest: Nathan (9 months on Thursday), is tired and in need of rocking to sleep. TTYL!
Owl Sweet Pea
 I made this card for my Sister-in-Law and Brother-in-law after the birth of their first baby (my nephew Felix!)
Here's the Breakdown for this one!
Stamps: Fox & Friends, Little Angel
Paper: Soft Suede and Whisper White Card Stock, Flocked Patterned Paper, Christmas Cocoa DSP
Accessories: Scallop Trim Punch, Scallop Circle Punch, Circle Punches, Scallop Oval Punch, Soft Suede Polka Dot Grosgrain Ribbon, "It's a Boy!" ribbon
Cheep Talk Thank You

I made this card for my in-laws after they had us stay for Christmas and New Year's. The card was based on a sketch challenge from Splitcoast Stampers.
Here's the Breakdown:
Paper: Whisper White, Taken with Teal and Pumpkin Pie card stock, and Sweet Pea Designer Series Paper.
Stamps: Cheep Talk stamp set and Whimsical Words stamp set
Accessories:
Scallop Trim punch, Whisper White Organza Ribbon, Circle Punches, Stamp'n'Write Markers in Taken with Teal, and Close to Cocoa
Thanks for Looking!
Tuesday, January 5, 2010
Mom's Birthday Card
 I made this card for my mom's birthday. I'm hoping she doesn't look at my blog before I give it to her! LOL! The design for this card was a Mojo Monday card sketch that I created my own version.
Here is the Breakdown:
Cardstock Colors: Pale Plum, Chocolate Chip, Whisper White
Designer Series Paper: Sweet Pea
Ink: Old Olive Classic Ink
Tools: Two-Way Glue, 1/16 hole punch, scissors, 1 3/8 circle punch, new scalloped trim punch
Accessories: Sweet Pea stitched felt flowers, chip board flower with punched circle, silver brads, ric rack ribbon
I hope you enjoy this card as much as I enjoyed making it! All cards are available for order!
Subscribe to:
Posts (Atom)